Showing posts with label recipes. Show all posts

Saturday, August 25, 2012

Frank's Fingers

So Frank is not a zombie but he is a monster! I make these yummy treats every year for the family. Last year, between work and church and everything else, I actually forgot and everyone let me know that was not acceptable!!!!

Unlike a lot of recipe on line, this is not a sugar cookie recipe, it is actually for Ice Cream Cookies and is a VERY old recipe which I double when making these.

Ingredients:

6 tablespoons softened butter
6 tablespoons powdered sugar
1 beaten egg yolk (important)
1 tsp vanilla
1 cup all purpose flour
candied cherries, cut in half (I use green ones but couldn't find them for this batch.)

Cream butter and sugar, add egg yolk, vanilla and flour and mix will.
add a couple drops of green food coloring into the dough.
Then, using a small amount of the dough (like a spoonful), form it into a cigarette shape. Sort of squish it on the pan, placing the cherry toward the end as the fingernail.
Take a knife and make 4 little slashes where the knuckle would be. Just look at your hand to get the idea.

Here is what they look like before being baked:


Bake at 350 degrees for 15-20 minutes. You'll get 22-24 monster fingers.

Here is what they look like after!


Creepy!

Monday, January 2, 2012

Yummy Peppermint Syrup!


Thanks Val for posting the recipe for the Peppermint Syrup.
Mallory and I put some over our vanilla ice cream and then we
crushed some candy canes up and sprinkled them over the top. 
 Yummy!!

Wednesday, December 7, 2011

Peppermint Pixies!

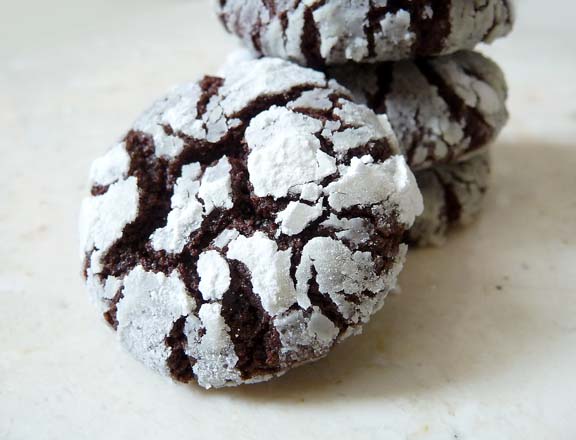
I found this recipe off foodbuzz.com and couldn't resist sharing it here given our theme.

Peppermint Pixies

Maybe it's the season, weather or just something in the air but lately I've been having a peppermint craving, the more intense the better it is. Since it's Christmas, I decided to make an ordinary chocolate cookie a little extra ordinary so that's how these peppermint pixies came to existence.

Commonly called chocolate crackles, chocolate crinkles and chocolate snowcaps, these cookies are delicious and bursting with chocolate flavour all on their own. The addition of creme de menthe and peppermint oil elevates them to another dimension and makes them seasonally special. As a child I recall fairy tales which often portrayed pixies as short and ill tempered little creatures. Therefore it would only be fitting to call these peppermint pixies because although they are tiny, they pack an intense mighty minty punch!

Fresh and cooled after baking, they are crisp on the outside and chewy on the inside. They will be chewy after a day. These are a simple roll and bake cookie. You may already have your own recipe if not enjoy the one below.

Peppermint Pixies
yields about 2 dozen

Ingredients
6 oz Bittersweet Chocolate
1/2 teaspoon Peppermint oil
1/4 cup Cocoa Powder
3/4 cup AP Flour
1 teaspoon baking powder
1/8
teaspoon salt
4 tablespoons butter
3/4C Light Brown Sugar - packed firmly
1 large egg
2 tablespoons milk
2 tablespoons creme de menthe (optional - omit for child friendly morsels)
Granulated and icing sugar for rolling - about 1 cup each

Method

  1. Chop chocolate into small pieces and melt over a bain marie. Set aside to cool.
  2. Sift dry ingredients together; Cocoa powder, AP flour, baking powder and salt.
  3. Cream together butter and sugar until mixture is light and fluffy. Add in egg and beat until just combined. Stir in peppermint oil to cooled chocolate and add to butter mixture. Beat until well combined.
  4. Add half of sifted dry ingredients and mix on low until just combined. Add in milk and creme de menthe if using and continue to mix on low speed. Finally add in remaining dry ingredients and mix until just combined.
  5. Portion dough in two and between parchment paper press each portion into a square about 3/4 inch thick. Place in refrigerator and chill for at least 2 hours.
  6. When ready to form balls. Pop the chilled dough into the freezer for about 7-10 minutes. While waiting, prepare the icing sugar and granulated sugar separately in a medium sized bowl for rolling.
  7. Remove dough from the freezer, using a knife cut dough into 3/4 inch squares. Since I find the dough to be of a sticky and wet consistency, I found that this method of working the dough as cold as possible helps alleviate the sticky situation.
  8. Between the palm of your hands, roll each square into round balls which will be roughly 1 inch in diameter. As you are rolling, the warmth of your palms will start to melt the dough which is what you want as this will make the granulated sugar stick to them.
  9. Chuck the balls into the bowl with the granulated sugar and swirl them around to be completely coated. Pick them out and set aside. Do this to all the remaining dough. You may have to wash your hands between rolling but I found for myself that working the dough in 2 portions only required my hands to be washed before getting to the 2nd final half.
  10. After all the balls are formed and covered in granulated sugar. Preheat oven to 350˚. Roll the chocolate balls in icing sugar to generously coat them. Don't be skimpy here as this is what will create the black and white contrast of the cookies.
  11. Place the icing sugared balls onto parchment lined cookie sheets about 2 inches apart and bake 10-12 minutes until they puff and crack. Keep in a tightly sealed container for up to a week.

It may appear that there are many steps but don't let this deter you from attempting this recipe. It's all about ease and efficiency and being organized. You'll understand the messy and sticky situation when you start or attempt this recipe. It really is easy if you are organized and have everything ready.


Tuesday, January 11, 2011

Dressed for winter......

I stumbled across this today while looking for inspiration. I adore vintage postcards with enchanted themes.......this one seemed appropriate to share......

a wee little gnome, coming home from a day's labor, eager to get into his little snow covered house and sit by the fire.......

photo


I wonder if he has some German hot cocoa waiting or perhaps some gluehwine instead?
hmmmmm

Thursday, February 18, 2010

Fairy Cake recipe

Picture of Lemon Blossoms Recipe

This is Paula Deen's famous Lemon Blossom cake recipe.....but I call them Fairy Cakes because they are made with a mini muffin tin.

These are AWESOME and easy to make. I thought you'd like to sample them while building your fairy houses!

Ingredients:

18 1/2-ounce package yellow cake mix
3 1/2-ounce package instant lemon pudding mix
4 large eggs
3/4 c veg. oil

4 c. powdered sugar, sifted
1/3 c fresh lemon juice
the zest of 1 lemon
3 Tbls veg. oil
3 Tbls. water

Directions

Preheat the oven to 350 degrees F.

Spray miniature muffin tins with vegetable oil cooking spray. Combine the cake mix, pudding mix, eggs and oil and blend well with an electric mixer until smooth, about 2 minutes.

Fill each muffin tin half way. Bake for 12 minutes. Turn out onto a tea towel.

To make the glaze, sift the sugar into a mixing bowl. Add the lemon juice, zest, oil, and water. Mix with a spoon until smooth.

Dip the cupcakes into the glaze while they're still warm, covering as much of the cake as possible. I do this by sticking a fork in the bottom of the cupcake and dipping it into the glaze....or I just put them into the glaze a few at a time, turning them to completely coat.

Place on wire racks with waxed paper underneath to catch any drips. Let the glaze set thoroughly, about 1 hour, before storing in containers with tight-fitting lids.

"Buttercups in the sunshine look like little cups of gold.
Perhaps the Faeries come to drink the raindrops that they hold."
~Elizabeth T. Dillingham, "A Faery Song"

Friday, October 9, 2009

I thought I'd share a couple of the recipes that I used in the cookbook I made for Gin. Enjoy!

  Monster Cookies
6 eggs 4 teaspoons baking soda
1 lb. brown sugar 9 cups oatmeal
1 ½ Tablespoons white corn syrup ½ lb. chocolate chips
½ lb. butter ½ lb. M & M’s
1 ½ lbs. peanut butter


Mix ingredients in order given. Drop on cookie sheet by Large Tablespoons….flatten slightly. Bake 12 minutes at 350 degrees.
DO NOT OVERBAKE!! Makes about 8 ½ dozen cookies.

Recipe from the cookbook Home on the Range by Sister Karol Jackowski


The “Thing” Cake
Preheat oven to 350 degrees. Grease well a 9 x 13 pan.
1 pkg. yellow cake mix 1 stick of butter or margarine
1 cup chopped pecans 1 egg


Mix together. Mixture will be real thick. Spread mixture into pan.


Take:
8 oz. cream cheese 1 box (1 lb.) powdered sugar
2 eggs

Mix that well and pour over thick mixture. Bake 45 min and
Serve warm or cold.

Another recipe by Sister Karol Jackowski

Wednesday, September 9, 2009

Frank's Fingers.....

FRANK'S FINGERS!

I had this posted on my blog from last Halloween and thought I'd share it with you all here. These cookies are soooooo cute AND they taste great!

I DOUBLE THIS RECIPE...

6 tablespoons softened butter
6 tablespoons powdered sugar
1 beaten egg yolk (important)
1 tsp vanilla
1 cup all purpose flour
candied cherries

Cream butter and sugar, add egg yolk, vanilla and flour and mix will.
prep the pan with either parchment or spray oil. Bake at 350 degrees for 15 minutes.

For monster fingers:

add a couple drops of green food coloring into the dough. Then, using a smaller amount of the dough, form it into a cigarette shape. Then sort of squish it on the pan, using the cherry as the fingernail. Take a knife and make 4 little slashes where the knuckle would be.

Here is what they look like before being baked:


You'll get 22-24 monster fingers.

Here is what they look like after!


creepy, but tasty!