I found this recipe off foodbuzz.com and couldn't resist sharing it here given our theme.
Peppermint Pixies
 Maybe it's the season, weather or just something in the air but lately I've been having a peppermint craving, the more intense the better it is. Since it's Christmas, I decided to make an ordinary chocolate cookie a little extra ordinary so that's how these peppermint pixies came to existence.
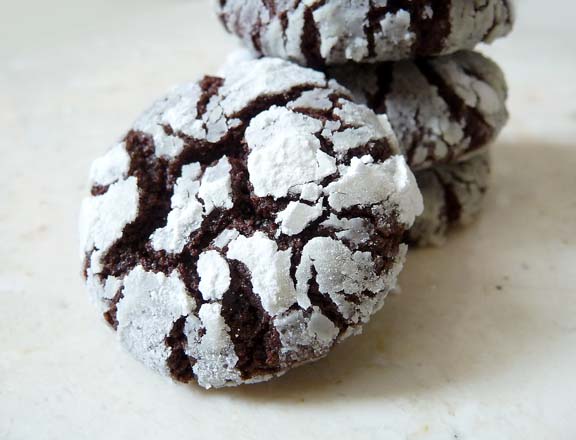 Commonly called chocolate crackles, chocolate crinkles and chocolate snowcaps, these cookies are delicious and bursting with chocolate flavour all on their own. The addition of creme de menthe and peppermint oil elevates them to another dimension and makes them seasonally special. As a child I recall fairy tales which often portrayed pixies as short and ill tempered little creatures. Therefore it would only be fitting to call these peppermint pixies because although they are tiny, they pack an intense mighty minty punch!
 Fresh and cooled after baking, they are crisp on the outside and chewy on the inside. They will be chewy after a day. These are a simple roll and bake cookie. You may already have your own recipe if not enjoy the one below.
Peppermint Pixies
yields about 2 dozen
Ingredients
6 oz Bittersweet Chocolate
1/2 teaspoon Peppermint oil
1/4 cup Cocoa Powder
3/4 cup AP Flour
1 teaspoon baking powder
1/8 teaspoon salt
4 tablespoons butter
3/4C Light Brown Sugar - packed firmly
1 large egg
2 tablespoons milk
2 tablespoons creme de menthe (optional - omit for child friendly morsels)
Granulated and icing sugar for rolling - about 1 cup each
Method
- Chop chocolate into small pieces and melt over a bain marie. Set aside to cool.
- Sift dry ingredients together; Cocoa powder, AP flour, baking powder and salt.
- Cream together butter and sugar until mixture is light and fluffy. Add in egg and beat until just combined. Stir in peppermint oil to cooled chocolate and add to butter mixture. Beat until well combined.
- Add half of sifted dry ingredients and mix on low until just combined. Add in milk and creme de menthe if using and continue to mix on low speed. Finally add in remaining dry ingredients and mix until just combined.
- Portion dough in two and between parchment paper press each portion into a square about 3/4 inch thick. Place in refrigerator and chill for at least 2 hours.
- When ready to form balls. Pop the chilled dough into the freezer for about 7-10 minutes. While waiting, prepare the icing sugar and granulated sugar separately in a medium sized bowl for rolling.
- Remove dough from the freezer, using a knife cut dough into 3/4 inch squares. Since I find the dough to be of a sticky and wet consistency, I found that this method of working the dough as cold as possible helps alleviate the sticky situation.
- Between the palm of your hands, roll each square into round balls which will be roughly 1 inch in diameter. As you are rolling, the warmth of your palms will start to melt the dough which is what you want as this will make the granulated sugar stick to them.
- Chuck the balls into the bowl with the granulated sugar and swirl them around to be completely coated. Pick them out and set aside. Do this to all the remaining dough. You may have to wash your hands between rolling but I found for myself that working the dough in 2 portions only required my hands to be washed before getting to the 2nd final half.
- After all the balls are formed and covered in granulated sugar. Preheat oven to 350˚. Roll the chocolate balls in icing sugar to generously coat them. Don't be skimpy here as this is what will create the black and white contrast of the cookies.
- Place the icing sugared balls onto parchment lined cookie sheets about 2 inches apart and bake 10-12 minutes until they puff and crack. Keep in a tightly sealed container for up to a week.

It may appear that there are many steps but don't let this deter you from attempting this recipe. It's all about ease and efficiency and being organized. You'll understand the messy and sticky situation when you start or attempt this recipe. It really is easy if you are organized and have everything ready.


3 comments:
These look yummy!
Yummy, thanks for the recipe!
xoxoxox
Those were my Dad's favorite kind of cookies. I never tried them with the peppermint though. Great idea!
Sherry
Post a Comment